
Grub Legacy (Grub 0.97) is a very powerful boot loader, developed by GNU. You can easily install Grub Legacy on USB and HDD from Windows.
Introduction
GRUB Legacy is not actively developed any longer. Only bugfixes will be made so that GRUB Legacy can stil be used for older systems. The current version being developed is Grub2. There is a bootloader that features the Grub Legacy and has a lot of improvements, it is Grub4dos. You can easily install Grub2, Grub4dos and other bootloaders such as Clover, Enoch with AIO Boot. So, Grub Legacy should only be used on older systems, or just for testing.
The official version of GRUB Legacy doesn’t support EFI booting; however, through version 17, Fedora used a greatly modified version that includes EFI support. See more about this at rodsbooks. And its official version does not support GPT disks, but Gentoo (and other systems) have modified versions that support this. In this article, I just installed Grub Legacy to boot in Legacy BIOS, on an MBR disk.
Install Grub Legacy
Installing Grub Legacy from Windows as well as Linux is very easy. Here I will install it from Windows.
- First, I will download the Grub Legacy binary from Ubuntu, the file name is grub_0.97-29ubuntu66_amd64.deb.
- Create /boot/grub or /grub directory on the root of the drive where you want to install Grub Legacy. The drive needs to be formatted in FAT32, which does not support NTFS and exFAT.
- Open this file with 7-Zip and extract the file in the data.tar\.\usr\lib\grub\x86_64-pc\ directory to the folder you created in step 2. We only need 3 files: stage1, stage2 and fat_stage1_5.
- Merge stage1 and stage2 files into a single file to write to the MBR. Run the following command:
cd /d G:\boot\grub
copy /b stage1+stage2 grublegacy
In the above command, I will merge these two files into a new file called grublegacy.
- Now I will use BootICE to write grublegacy to MBR. See the screenshot below.
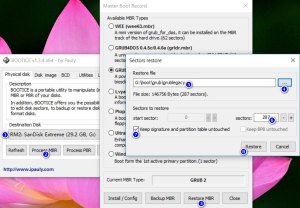
- In the Destination Disk (1), select the disk you want to install Grub Legacy, either USB or HDD.
- In item #7, check this box to keep the partition table information.
- Now, I will boot disk device in step 5 to continue, can use VirtualBox.
- There will be a black screen to use the commands. Use the find command to find the partition where you put the /boot/grub/stage2 file. You must always use lowercase letters for commands as well as directories and files.
find /boot/grub/stage2
Output:
(hd0,0)
- Next, use the setup command to install.
setup (hd0) (hd0,0)
- (hd0,0) is the partition containing the stage2 file.
- (hd0) is the disk containing the partition (hd0,0). If the partition is (hd1,0) the disk will be (hd1).
- Enter the help setup command for more options. By default, Grub will look for files in /boot/grub and /grub. If you want to use a directory under another name, use the –prefix parameter. Example: /aio/grub.
setup --prefix=/aio/grub (hd0) (hd0,0)
- The output is as below, which means you have successfully installed Grub Legacy.
Checking if "/boot/grub/stagel" exists... yes
Checking if "/boot/grub/stage2" exists... yes
Checking if "/boot/grub/fat_stage1_5" exists... yes
Running "embed /boot/grub/fat_stage1_5 (hd0)"... 20 sectors are embedded.
succeeded
Running "install /boot/grub/stage1 (hd0) (hd0)1+20 p (hd0,0)/boot/grub/stage2
/boot/grub/menu.lst"... succeeded
Done.
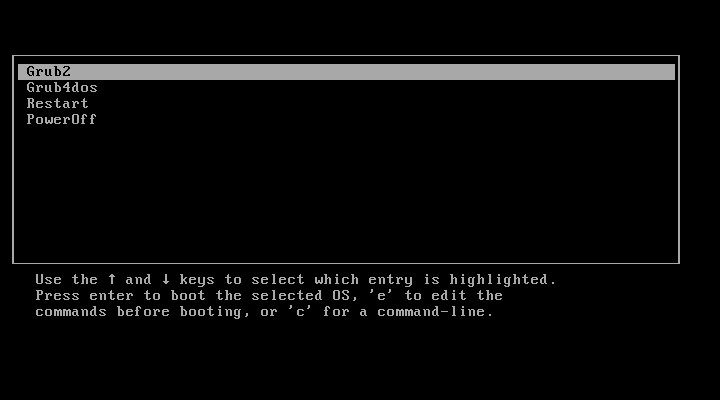
- Finally, create a configuration file for Grub Legacy. This file should be named menu.lst and is in the same directory as the stage2 file. Here I just added some simple menus.
title Grub2
kernel /aio/grub/i386-pc/core.img

title Grub4dos
kernel /aio/tools/grub4dos/grub.exe

title Restart
reboot

title PowerOff
halt

So, in just a few easy steps, you’ve finished installing the Grub Legacy on Windows. Note that you can also easily install Grub2 on Windows, use Grub2 instead.
Good luck!