
AIO Boot is a user-friendly and easy to use tool. This article will guide you on how to use AIO Boot for USB and HDD.
AIO Boot depends on many other tools to support more features. Unlike other tools, AIO Boot will use its current drive as the destination drive. This is useful for transferring USB to different computers. Here are some basic instructions on how to use AIO Boot.
Prepare
- A computer running Windows XP or later.
- Download AIO Boot.
- A USB or hard drive.
- You can partition and format the drive before installing AIO Boot. BOOTMGR does not work on Logical partitions, you should use Primary instead.
- Use FAT32 format for best support. Includes support for booting in UEFI mode and Linux operating systems.
Installation
- Run AIO_Boot_Extractor.exe
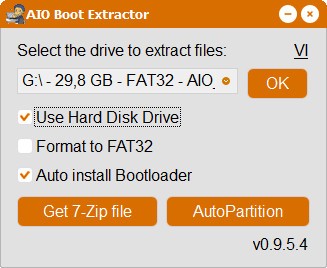
- By default, the program shows only USB drives. If you want to install to your hard drive, select Use Hard Disk Drive.
- Select Format to FAT32 if you want to use the FAT32 format for the drive. Note: All data available on this drive will be lost.
- If you do not want the program to automatically install the Grub2, Clover and Syslinux bootloaders. Please uncheck Auto install Bootloader.
- Select the drive where you want to install AIO Boot in the drop-down list.
- Click OK to extract the files and proceed with the installation.
- Repeat the above steps if you want to install AIO Boot on many different drives.
AutoPartition
This feature only supports removable devices like USB, SDcard… Use this feature if the installation of AIO Boot is not supported in the way above. Note: All the drives and data available on this disk will be lost.
- Run AIO_Boot_Extractor.exe
- Click the AutoPartition button.
- You will now see a list of devices and options.
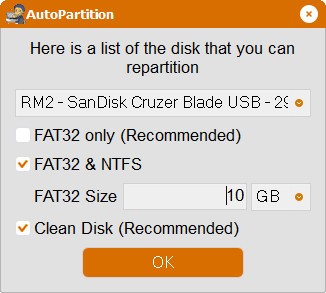
- FAT32 only: the tool will only create a single partition in FAT32 format.
- FAT32 & NTFS/exFAT: the tool will create two FAT32 and NTFS/exFAT partitions. Note that the exFAT format will not support Windows Boot Manager in Legacy mode.
- FAT32:
- You need to use FAT32 partitions to support booting in UEFI mode.
- Some operating systems like Bitdefender, Fedora and Gentoo… do not support booting on NTFS partitions.
- Ubuntu and Debian’s persistent mode is also not supported on NTFS partitions.
- So we need to use the FAT32 format.
- NTFS/exFAT:
- NTFS partitions can store files larger than 4GB. You can save large files such as backups, VHD files…
- You can use resident mode larger than 4GB for Android-x86, Remix OS, Phoenix OS and WifiSlax 4.12.
- So we need to use the NTFS or exFAT format.
- Enter size for FAT32 partition. The remaining space will be used for NTFS/exFAT partitions.
- FAT32:
- Clean disk: This option is always recommended. Use this case if the installation of Grub2 fails.
- Click OK to proceed with the installation.
AIO Boot Creator
After extracting AIO Boot to a drive as above steps, AIO Boot Creator (AIOCreator.exe) will be run automatically. Next time, you just run the AIOCreator.exe program on the drive that you extracted to use.
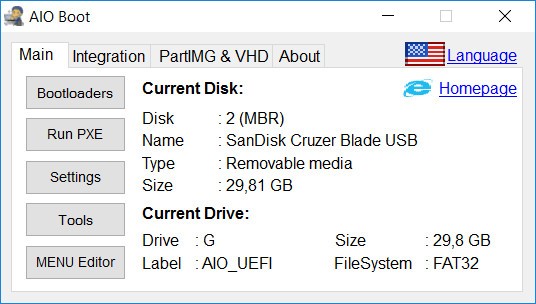
Main:
- Bootloaders: You can install the bootloaders in this section, including Grub2, Clover, Enoch Chameleon and Syslinux. Or choose between Grub4dos and Grub2 as the default boot loader in Legacy mode, I recommend using Grub2, unless it is not compatible with your computer.
- Run PXE: Initialize the PXE server to boot and install OS through Network boot. Tiny PXE Server and FreeNFS will be automatically run along with the appropriate settings.
- Settings: Change settings for Grub2 and AIOCreator.exe.
- Tools:
- Supports to create AIO Boot DVD from a drive, burn and boot AIO Boot from CD or DVD.
- Test BOOT with QEMU to make sure everything works. You can also boot from USB in VirtualBox or VMware.
- Check for updates. You probably do not need to do that since AIO Boot Creator will automatically do this every time you run the program.
- There are also included tools that you can use including 7-Zip File Manager, Fastest File Splitter and Joiner and BootICE.
- Menu Editor: Edit the Grub2 and Grub4dos menu names of the packages that you have integrated. You can also remove the package to re-integrate its new version.
PartIMG & VHD:
AIO Boot supports booting most Windows and Linux operating systems in a single USB drive. However, there are some Linux distributions that the AIO Boot does not support integration in the usual way. AIO Boot will MAP the ISO file or PartIMG with Partition Image Mapper or PartIMG Mapper into a new partition and boot it from the Grub2 menu. For Linux, you can use the ISO file directly, but for Windows, you need to create a partition image file (.PartIMG).
AIO Boot also supports Windows VHD integration to boot VHD from USB. This tool supports creating a VHD file from the install.wim file in just a few clicks.
Integration
This is the most important feature of AIO Boot. It allows you to integrate multiple operating systems Windows, Linux, Antivirus, Android and DOS programs into the USB drive. See the list of packages that AIO Boot supports.
When you integrate an operating system with AIO Boot Creator, it will copy or extract the ISO file to the drive, then add a menu to Grub2, Grub4dos and iPXE. All you need to do is to follow the simple steps below:
- Run AIOCreator.exe, switch to the Integration tab.
- Select a package that you will integrate in the drop-down list.
- Select its ISO file and click the OK button.
- Enter the name of the menu, you can set to skip this step in the Settings.
For Linux or MacOS users, you can use the Grub2 File Manager to boot ISO files without having to integrate.
Update
AIO Boot regularly releases new versions. Updating to the new version will not lose existing data.
If your computer has a network connection, just run AIOCreator.exe. It will automatically check and help you update to the latest version.
- Run AIO_Boot_Extractor.exe
- Select the drive where you installed AIO Boot in the drop-down list.
- Click OK to proceed with the update process.
- If you have installed the AIO Boot on multiple drives, repeat the above steps for those disks.
Uninstall
- For USB, just delete the files that the AIO Boot has installed. Once you install the bootloader of other tools, the bootloader will be replaced without removing.
- For Hard disk drive:
- Please make sure that you can boot into the operating system without booting through Grub2 of AIO Boot.
- If the computer is still booting directly through the AIO Boot’s Grub2, restore the bootloader first.
- You can use a Windows DVD, or Linux, that corresponds to the operating system installed on your hard drive to restore its bootloader. For Windows, select Startup Repair.
- Or, simply run AIOCreator.exe, go to the Bootloaders section and proceed to restore the Windows bootloader.
- After the startup of the computer no longer depends on Grub2 of AIO Boot. Please delete the files that the AIO Boot has created on your drive.
If you have any questions, please leave a comment below.
My problem is that the keyboard stops working after some time not letting me choose the option I want. From what I researched, it could be the lack of the driver, I tried to copy the .sys files to some folders but without success, does anyone have any idea how to incorporate the drivers?
Great app but got one question.
Trying to integrate Gandalfs Windows10PE which is greater than 5GB, can’t find the option to split the iso to enable it to go on FAT32 stick.
Hi Jerry,
if your file system is FAT32, while integrating system automatically asks it to split. Are there any prompts for splitting? or it is showing as invalid image.
I am getting an error “Invalid Image” while integrating Windows 7 x86/x64 dual boot iso file. I have an old dual boot iso of Windows 7 which is integrating fine.
The image is valid but as it is about 5G it states must use exFat or NTFS neither can be used for uefi boot.
Note this is a PE based build not the windows install
Hi Bro,
Will be happy to assist you via anydesk or teamviewer. i use sergei strelec which i think is one of the best WinPE i have used till now. I haven’t used Gandalf Win10PE. tried to download but website not opening (Bad Reputation).
please let me know in case you need remote assistance.
Thanks
Hi,
I wouldnt say its bads but will not allow access if you have an ad blocker and almost ‘forces’ a donation althought the image can be found if you search hard enough.
It contains a lot hence the size, never came across the sergei strelec image, looks good I’ll give it a try.
Thanks for you help.
hi, i use tails live. but for usb-sticks they recommend .img type. but AIOcreator only accept .iso files.
what to do?
sincerely
henry
How to Install Windows XP
Integrated windows XP using AIO tool
but during boot it wont show XP installation menu anywhere
win 7 8 10 working perfect
did i miss something ?
how could i get AIO_Boot_Extractor.exe
Win 10 bundle ISO’s, e.g. Business Editions, are >5Gb, which is too large for FAT32. Seemingly, the options are to (A) let AIOCreator split the file, or (B) use an exFAT partition.
Both options result in a problem; in scenario (A) you can’t access the image on the USB directly, and in scenario (B) you can’t UEFI boot.
Is there a workaround for either of these? For example, have Grub in a FAT32 partition, but put the images into exFAT partitions?
Hi,
How can you login if you accidentally deleted the AIO folder in windows 10. I am stuck in grub rescue and I’m not familiar with this tool. Can anybody suggest ?
Thanks
Dear AIO tm, instructions look fine, but oon latest AIO version (9.9.17) that I got there apears to be no disk option (tickbox) I’m trying to set up a 4 tb HDD on a Bios only hardware, thank you for your time.
kind regards.
tails recommend, to use for usb-sticks only the img file, not iso.
but AIO creator accept only iso. what to do? please help
Try this – http://www.imgtoiso.com/
Hi
Is possible to lunch setup inside windows to perform an upgrade version of it?
thank you
Baixei hoje, mais que pena ter tirado o idioma português brasileiro
how to integrate Service Pack for ProLiant ?
https://techlibrary.hpe.com/us/en/enterprise/servers/products/service_pack/spp/index.aspx
httpd error, Socket Error # 10013. Help?
http (IIS Service ) will be ON on your server ; Disable or stop your IIS server .
Hello! Kudos to the programmers at AIO Boot. I saved a lot of time with it and can’t understand why some rate it so badly. I don’t think many people know how much work there is in a project like this. I came across this page by accident. The best I’ve found so far. Thank you so much!
Hallo!
Ein ganz großes Lob an die Programmierer von AIO Boot. Ich habe damit sehr viel Zeit gespart und kann nicht verstehen wieso einige es so schlecht bewerten.
Ich glaube viele wissen gar nicht, wie viel Arbeit in so einem Projekt steckt. Ich bin eher zufällig auf diese Seite gestoßen. Das Beste was ich bis jetzt gefunden habe.
Vielen Dank!
Can AIO Boot move four separate single boot disks onto one multi-boot 4TB disk?
(1) 700GB Win7 professional (32bit) to 1TB partition
(2) NetBSD 9.0 fresh install into 2nd 1TB partition
(3) FreeBSD 12.1 fresh install into 3rd 1TB partition
(4) OpenBSD 6.7 fresh install into fourth 1TB partition
The order on disk does not matter, but they should all be bootable from a boot menu
THERE IS A LOT OF BULLSHIT NONE SENSE IN THIS WEBSITE NO PROPER GUIDELINES NO PROPER DOWNLOAD LINK AND A LOT OF BULLSHIT.
THIS IS PROPER WEBSITE https://www.hirensbootcd.org/ GO THERE AND AT LEAST THEY GIVE WHAT THEY SAY!!!!!
FUKING FULL OF SHIT FULL! OF!!! SHIIIIIT!!!!! ON THIS SITE
Dude,
Hiren’s is great, no doubt, but you are comparing apples with a combine harvester, they serve two different purposes.
My suggestions to you are:
1. Research your topic, in order to avoid posting comments that highlight your ignorance.
2. Don’t hurl abuse at developers who provide great software for free – Being deficient in IT knowledge isn’t an excuse.
3. On the basis of how angry your inability to use/understand the software made you, seek professional help and stay away from fragile objects.
Gostaria de saber como faço pra desistalar ele da unidade usb sem danifica o pen drive
pois eu formatei o pen drive e esta com erro
Dear sir.. How about second part installing windows, xp… They show error file not found… At second process.. Presetup.cmd not exist.. File not found.. They look like searching xp installation files for continuing installing process
Thank you very much for the detailed guides and all the work you’ve put into making this intuitive and lightweight.
I have one question regarding the boot menu options. I have tried to update the menu in the AIOBoot dialogue window, and I’ve even gone in and manually removed the folder with the ISO, but when I PXE boot and look at the options of what to boot from, the old options are still there. Am I missing something, or is this a bug?
Thank you again!!
Jess
Hello
thank you very much for this software it’s great application there may be a little shoe
I would like to know how to uninstall an iso or remove it from the menu.
thank you in advance
Hi, Great prog. But got one question.
I set up on a USB flash with FAT32 and NTFS using autopartition, works perfectly
However I want to install on SSD, as autopartition does not work on SSD I partitioned it same as USB and ran AIOBoot but it appears to ignore FAT32 partition.
Can I set up on HDD using 2 partitions as per USB flash?
Thanks in advance for your help and keep up the good work.
J
wrking for export comaney
AIO Boot creator is permanently preset to search only for ISO files, so the provided instruction to use it to browse to one of the downloaded WIM files hosted on Google Drive cannot be seen or selected, so the setup process ends right there in failure.
Thanks for great utility! But I have a question. I try to make boot USB with antivirus collections. First I made ESET SysRescue Live and everything work fine, after that I made drweb-livedisk-900-cd, but this one stop to bot BusyBox (initramfs). Tell me pleas what is the problem and how can I fix it? Thanks!
THANK YOU FOR THIS product and instructions, I have done USB but my question is, can I install mac OS by inserting the disk that contains the os (LION 10.7) I want to be sure before attempting any installation, thanks again.
program totally not work,
no matter how to format, gparted, fat32 format tool, the build in option it keeps getting error contact owner,
tested serveral sd cards, usb sticks, harddrive.. tryed all the settings in de extractor app, but everything goes to error 🙁
and no there is no error log, because the app does not even format the drive or anything 🙁
Yeah i have same issue but i always loose the drive letter and have to re assign the letter before i can use the drive again.
Please any help…. Thank you
10:11:44 PM ROOT=G:\AIO\
10:11:44 PM DHCPd 192.168.8.105:67 started…
10:11:44 PM DHCPd 192.168.8.105:4011 started…
10:11:44 PM TFPTd 192.168.8.105:69 started…
10:11:45 PM httpd error, Socket Error # 10013
Access denied.
This might be too late, but if you are on Windows 8 or higher, you will need to edit the registry and reboot for HTTPd to work. Go to HKEY_LOCAL_MACHINE\SYSTEM\CurrentControlSet\Services\HTTP and change “start” to 4.
when i type my share drive name i can not type \\ sign it looks ## and i change my keyboard but still same issue os i can not type my share drive
hi,
how to change in the first windows (gnu) the time out and defaut load ?
Hmm, I can’t find my post here.
Anyways, how can I install Sergei strelec and boot into uefi mode and display the strelec menu it displays normally. It comes with a boot menu of it’s own. Creating a usb through rufus just for Sergei displays that menu but using aioboot it’s gone. I can’t see the other options. Can someone please tell me how to install it with that menu visible?
Hi, this is great. I’ve been playing with the pxe aspect and was able to change the main menu default selection and timeout, but was wondering if I could set something similar for the submenu it goes to i.e. the dosprogs submenu. I’ve tried a few things but no success so far. Thanks.
How to Install Windows XP
Integrated windows XP using AIO tool
but during boot it wont show XP installation menu anywhere
win 7 8 10 working perfect
did i miss something ?
it s amazing software , very easy ,fast,and ther is more option i like it
but how can i edit order of setup ,ther only remove option in MENU Editor
i turned off secure boot and ran in uefi mode but I still cant see my winsetup and PE folder that’s usually {P} it doesn’t show up the first option is Linux like the win folder doesn’t even show up but if I run in legacy mode it is there I thought this drive can be used on uefi and legacy why isn’t it working on uefi when I turned off secure boot
What is the architecture of your winsetup and PE? 32 bit or 64 bit? UEFI is architecture-sensitive, in other words, a 64 bit computer with UEFI turned on can only run (or load) 64 bit windows and a 32 bit computer can only load 32 bit OSes (though there are some exceptions involving linux). You should check your .iso files for winsetup and PE to see if there is a folder named “EFI”. If there isn’t then they can not be loaded by UEFI.
Greate post. Keep writing such kind of info on your blog.
Im really impressed by it.
Hello there, You have done a fantastic job. I’ll definitely digg it and
personally recommend to my friends. I am confident they will
be benefited from this site. generic viagra
I chose Windows UEFI loader instead of Grub2 in creating self-booting OS installers in flash USB.
will it be as successful as grub2?
I did so because of worrying grub2 pick would hinder USB installer to install into GPT HDD that’s ready prepared to serve OS with UEFI system.
that I was determined to pick Windows UEFI loader,
please give the bright guidance or hints..Thanks before
Thanks a lot
I chosed Windows UEFI loader instead of Grub2 with GPT feature and capability in mind, will it be as successful and good as Grub2?
i mind and worry if it’d be so then the USB still cannot be used to install Linux onto GPT ready HDD i have prepared, if i picked Grub2
please give clear guides!
How do I intergrate an iso of WinXP Pro using AIO Boot? How do I intergrate WinPE into AIO Boot?
Hi dev, I guess my previous post is still under moderation but I found the answer for that. My installation works and every os works great so thanks for such a great tool. My problem comes with these two oses. Sergei strelec and UBCD, I can’t boot to their menu in uefi mode, in legacy it works fine.
In uefi mode I can’t see ubcd at all, and to get to Sergei I have to go to the winpe menu wherein I can boot to Sergei but it boots to the winpe without showing its menu for other tools and as such. Why? I am in the grub2 menu only not grub4dos which isn’t supported in uefi mode I guess.
How can I delete an integration which I did previously to free some space or just to upgrade the iso/special package that I integrated? Is there a way to do so?
I found the answer to it so, no need for it. It’s under the menu editor option. 😊😊😊
how to install 2k10?
Hi, I trying to boot from my hard disk but can’t seem to bypass the AIOBoot screen. Tried loading from Grub2 yet the same.
Please advice.
hi, great tool !! i was looking for tool like this because i want to create a multiboot usb for purposes, including
Linux Mint 19, Windows 10 & 8.1, Kaspersky Rescue Disk, Bitdefender, Gandalf’s WINPE 10, Macrium Reflect and can add more in future.
will this all-in-one (for me) require partitions FAT32, NTFS/exFAT and this AIOCreater will automatically check and use partition like FAT32 for Linux and NTFS for Win 10/8.1 etc. is it or i misunderstood ?
with best regards
No, FAT32 partitions will not be able to store files larger than 4GB. But some Linux distributions like Fedora, Gentoo do not support NTFS. Use whichever format you choose.
Hello,
I would like to know what are the prerequisites for booting on a Uefi Bios because I tried this does not work..
Thx
You need to format the drive to FAT32. Using the AutoPartition option in AIO Boot Extractor will be fine, you can use a single FAT32 partition or both FAT32 and NTFS.
Please can I add other programs , all in one boot? eg office and other software. if so how?
Hi i have a problem right now i already uninstall every aioboot out of my computer but my drive that install it to still appear aioboot icon and name of that drive still appear aioboot how to fix this problem?
Delete the autorun.inf file and restart your computer.
Hello, using AIO boot to boot linux tails and kali as well,from a USB. The ISO files seemed to integrate just fine. Whenever I boot the OS (both of them) I get an error message saying (initramfs) Unable to find a medium containing a live filesystem. I did not use the fat32 only filesystem option, I used Fat32,NTFS,ExFAT and it created multiple partitions. Could this be the problem and I need to reformat using fat32 filesystem only?
Hello,
How to I change back the c: drive icon and name to the defaults after deleting the AIO Boot files created on the c: drive per the uninstall instructions above?
Every time I try to change the volume name it displays “AIOBOOT” for the volume label and your custom icon cannot be changed back to default. I am running Windows 7 x86.
Your assistance would be appreciated!
James
Just delete the autorun.inf file.
I can’t boot to Windows. I have tried startup repair but my pc is still booting directly through the AIO Boot’s Grub2
Please try booting Windows from Grub2, then run AIOCreator.exe and restore Windows from the Bootloaders.
i have deleted AIO dir and EFI dir. Now my pc boots to grab rescue
I am stuck with grub rescue screen. I have tried with bootrec commands but no luck, Any suggesstions?
Using these commands will work.
Were you able to fix this issue? I’m stuck at the aioboot screen while booting my laptop
Hi. I cannot integrate Win10XPE ISO (http://win10se.cwcodes.net/Compressed/). Thanks again 🙂
Send me file /AIO/Tools/error.log.
error.log
7/22/2018 10:04:46 PM – 1116 – Windows 10 (Version 10.0, Build 17134, 64-bit Edition)
Can you send me an email?
Works on version 0.9.8.14 🙂
Hi, Tu Nguyen
After Extracting AIO_Boot_Extractor content based on installation instruction of this page .. for integrating windows i got this error
(“Error, please contact the author for support!”) and operation was not successful.
and my Flash Memory now Write Protected
How Can I Fix It?
Send me the file /AIO/Tools/error.log, I will check it.
i have no such file in that directory.
root content:
+ AIO (folder)
+ EFI (Folder)
+ AIOCreator.exe
+ PartIMGMapper.exe
it is write protected and cannot be deleted.
I think that is due to another cause, maybe just a coincidence.
Looking for information on Google, I think I will not be able to help you.
not coincidence bro.
i try almost everything ..
+ windows format (not working – i got write protected error)
+ try Linux for formating (failed)
+ DISKPART (failed)
+ other partitioning and formating software failed (same)
+ edit registery (not working)
There Must Be Another Way to deleting your software ..
my flash memory is Toshiba USB3.0 TransMemory-MX
https://www.toshiba.co.jp/p-media/wwsite/usb.htm
Hi,
This is a great tool, congratulations. If I want to integrate Trinity Rescue Kit what option should i choose?
Hi, check out my latest post.
Thanks man!
hi… I got the issue during Window 7 Installation. like Network Path Not Found how to solve it..?
Hi Tu Nguyen,
I’m being prompted by an error. After TFTP boot.
“missing file :\AIO\pxelinux.0”
am I missing something? or mis configured setting?
TAI
What file do you choose for the Tiny PXE Server Boot file?
how to install windows 7 uefi in legacy bios?
You can use DISM.
many thanks for reply
Trying with a fresh install and new image.
“resource exceeds length of file”
“could not patch wim boot.wim
“press a key to reboot”
Sorry but this boot.wim file is not standard.
You can try booting it through Grub4dos.
Access the File Manager menu, browse to the file to boot it through Grub4dos.
Or add this code to /AIO/Menu/Grub4dos.lst:
Then copy the AX_Recovery.iso file to the root directory of the USB drive.
Hi !
This is the ISO file that I sent to you. I followed your instruction and it works ! The other instruction is different that you sent in my e-mail but also works!
“, open the ISO file and copy the “sources\boot.wim” file to /AIO/Files, then boot from the “Boot WinPE via WimBoot” menu.”
Thank you very much.
Thank you, it’s perfect. But I did this instead, I changed it to…
set gfxmode=1366x768x32,1366x768x24,1366x768x16,1366×768,auto
Cheers 🙂
Great job Tu Nguyen! I tried most of the well known multiboot creators but so far AIO Boot is the only one that successfully worked for me on my external HDD. The packages I have integrated are Windows 10 installer, Sergei Strelec and Linux Mint. I just have one concern…. when I boot into Windows 10 installer and Sergei Strelec independently, the display resolution is 1366×768 (my PC’s default resolution) but when using AIO Boot the resolution changes to 1024×768. Is there a work around for this? Thanks.
Hi,
Try to remove this line in /AIO/grub/grub.cfg:
set gfxmode=1024x768x32,1024x768x24,1024x768x16,1024x768,autoHi, I have a little problem over here. Used so far regular USB sticks. Now I wanted to install it on an external SSD. Installation works so far, but AIOCreator fails to open (“Error, please contact the author for support!”)
I used several different disk layouts to no avail: FAT32 and NTFS, FAT32 only, small partition(s), different orders of the partitions.
The SSD is 256 GB, so nothing exceptional large as well.
Hi,
Please send me the file \AIO\Tools\error.log.
have you plane to add DLCBoot to Integration -> Special Pack list?
sorry, i mean, plan, 😀
I have a Lenovo Thinkpad T430 with Intel HD4000 video not NVIDIA is there a config.plist available for the Intel HD4000?
Sorry, I have no knowledge for installing macOS.
When I’m trying to integrate Parrot Security OS, I’ve got the message:
“Please extract all files to the root directory of your USB or Hard drive first! See the home page for more information.” I know what is root directory, but I think I’m doing something wrong. Is there some special way to integrate “Parrot OS”?
Sorry, try this:
Linux -> Auto Detect.
Thank you so much! It works!
Hi! Thank you very much for such a great tool! I have a question: when AIO Boot finishes creation the main menu says “Current Disk:
Disk :2 [MBR-Legacy]. Not just “Disk :2 (MBR)”. Is that all right?
Yes, it’s right. Disk :2 [MBR-Legacy].
Thank you for answer! And will it boot in UEFI BIOS as well?
Sure.
Thank you very much!
How can I write ISO created by AIO boot to usb ?
Hi. Use 7-Zip or any other program that supports opening ISO files. Extract ISO to USB drive. Run AIOCreator.exe > Bootloaders > Grub2 nor Clover, Syslinux, Chameleon.
What country you are from ? Where do you reside now ?
Hi,
I’m Vietnamese, I live in Vietnam.
Thanks, I wish you all the best from Russian Linux society for your talent and we are hope to get the same for Linux. )))
Thank you for that and the videos. I hope to have a version running on Linux in the future. But that does not seem easy because I do not have much knowledge on Linux.
All roads starts from the first step, never be afraid. )))
Thanks, you’re right.
You can make new tab – Video tutorials and put videos you think suitable.
It would be great. I will look into adding useful links in the future.
Good Luck