
macOS Mojave is the latest version of the macOS operating system, you can easily install macOS Mojave on VMware Workstation.
- Introduction
- VMware macOS Unlocker
- Create macOS virtual machine
- Add macOS image
- Install macOS
- Install VMware Tools
Introduction
macOS is a proprietary operating system that runs on Apple Macs. There are now many techniques you can use to install macOS on your Intel PC (Hackintosh). From Windows, you can use Clover Boot Disk to create macOS Mojave bootable USB with just a few clicks. But not all hardware is supported, and you also need to refer to a lot of documentation so that macOS can be installed and running on your computer.
An easier way to experience macOS right on a computer running Windows or Linux is to install macOS on VMware Workstation. The advantage of this is that you will be familiar with the installation and use without affecting the settings on the computer. By using virtual machines, you can use macOS and Windows or Linux simultaneously. Using virtual disks ensures that all data on the real disks will not be affected. But I noticed running macOS on the VM is very slow, although I set it up to 4GB of RAM.
This article will guide you how to install macOS Mojave on VMware Workstation. I created a virtual disk containing the macOS installer, you just downloaded it, attached it to the virtual machine, and installed it. I’m not sure if VMware Workstation 12 supports macOS 10.14 virtual machines, but version 14 and 15 has support. I tested on VirtualBox and it does not work.

VMware macOS Unlocker
By default, VMware does not provide the option to create macOS and Mac OS X machines. Fortunately there is a tool that helps me unlock this option, this tool is VMware macOS Unlocker. It supports Windows, Linux and MacOS. Skip this step if you were able to create a macOS virtual machine.
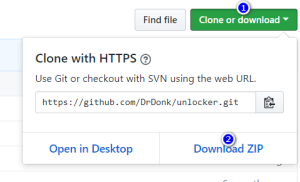
- Go to the VMware macOS Unlocker page to download. Click the Clone or download button, then click Download ZIP.
- Power off all virtual machines running and exit VMware.
- Extract the downloaded .zip file in step 1.
- On Windows, right-click on the win-install.cmd file and select Run as Administrator to unlock. For Linux and macOS, run the lnx-install.sh or osx-install.sh files under root (not tested).
- After the unlock process is complete, run VMware to create the macOS virtual machine.

Create macOS virtual machine
Creating a macOS virtual machine is very simple, here are the steps to create a virtual machine on VMware Workstation:
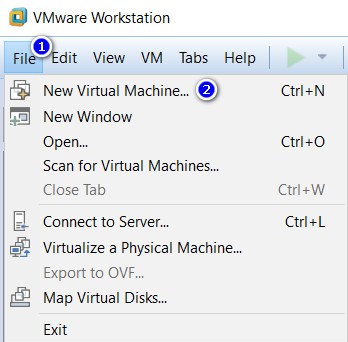
- Click File, select New Virtual Machine…
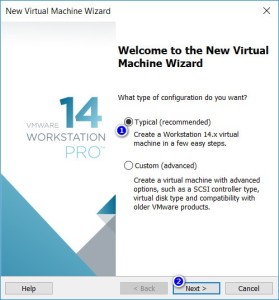
- Select Typical (recommended) and click Next.
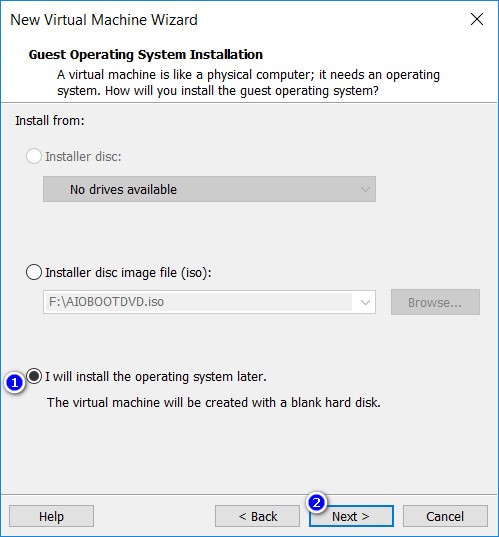
- Select I will install the operating system later. and click Next.

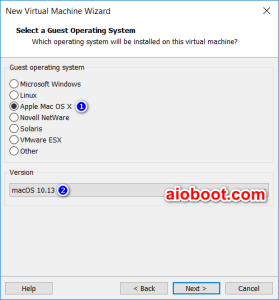
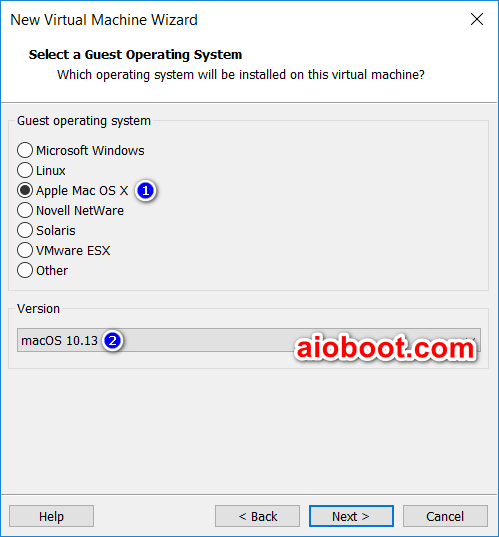
- Select Apple Mac OS X in the Guest operating system section and select macOS 10.14 in the Version section. Click Next.
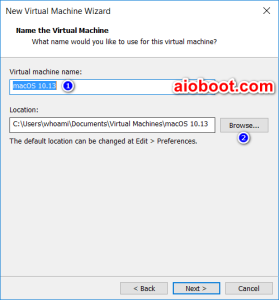
- In the Name the Virtual Machine window, name the virtual machine and virtual machine directory. I personally would put it on a different drive than the system drive.
- Select the size for the new virtual disk in the Specify Disk Capacity window. This is the virtual disk to be installed macOS. Click Next and then Finish.


Add macOS image
After creating the virtual machine, we have a virtual disk to install macOS Mojave. Now we just need to add a new virtual disk containing the macOS installer. You can also create a macOS bootable USB, then boot USB in VMware Workstation to install but using a virtual hard disk will be a lot simpler.
- Download the OSX_10.14.0_Installer.vmdk file. This is an installation image of macOS Mojave. You do not need to use the Hackintosh ISO.
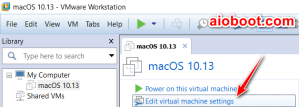
- Select the virtual machine just created, click on Edit virtual machine settings.
- In the Memory section, you can increase the value to make the virtual machine run faster. I increased it to 4096MB (4GB) but macOS still runs very slowly.
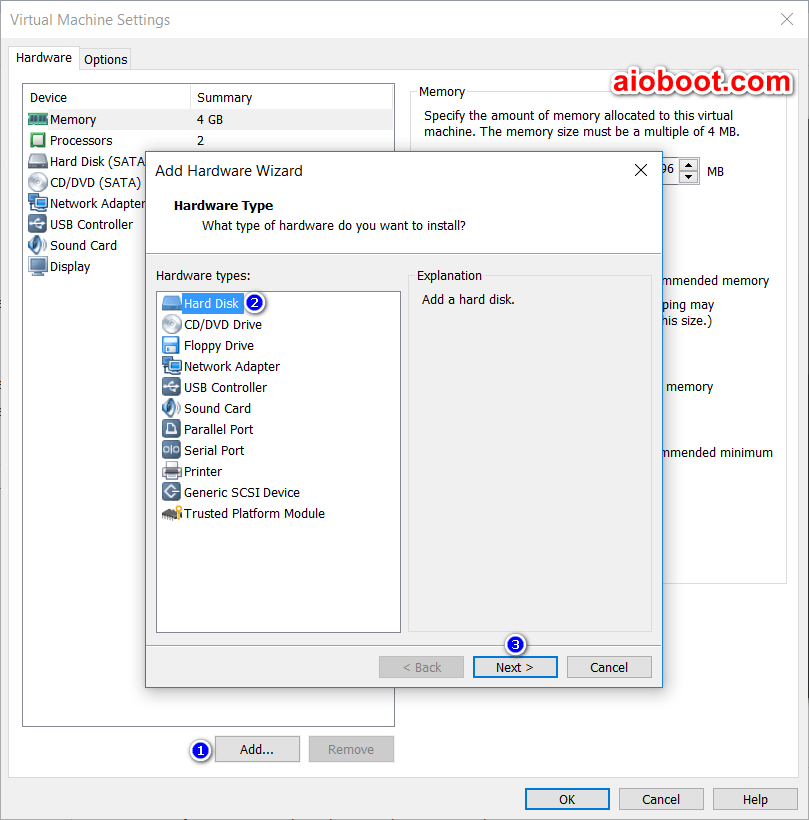
- Click Add…, then select Hard Disk and click Next.

- In the Select a Disk Type window, click Next.
- Select Use an existing virtual disk in the Select a Disk window and click Next to continue.
- In the Select an Existing Disk window, click Browse… to select the OSX_10.14.0_Installer.vmdk file that you downloaded in step 1.
- Click Finish, then click OK in the Virtual Machine Settings window.

Install macOS
Now you can boot the virtual machine to install macOS Mojave. I encountered an error when I clicked the Power on this virtual machine button:
VMware Workstation unrecoverable error: (vcpu-0)
vcpu-0:VERIFY

vmcore/vmm/main/physMem_monitor.c:1279
If you get the same error, you can fix this by adding the line “smc.version = “0”” to the “%ProgramData%\VMware\VMware Workstation\config.ini” file. The easiest way is to run Command Prompt under Admin (find cmd.exe, then right-click and select Run as Administrator), then run the following two commands:
echo.>>"%ProgramData%\VMware\VMware Workstation\config.ini"
echo smc.version = "0">>"%ProgramData%\VMware\VMware Workstation\config.ini"
Ok, my virtual machine has booted, I’ve seen the screen to install macOS.
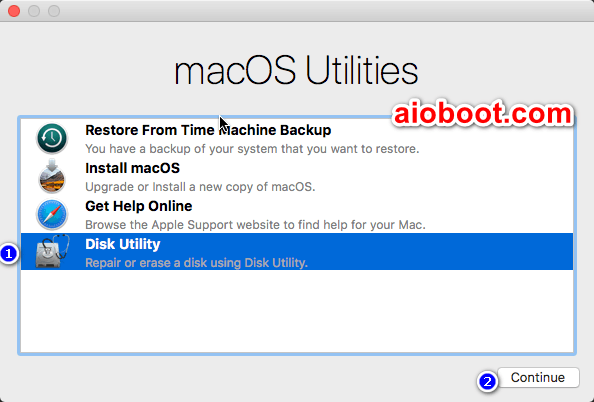
On the macOS Utilities screen, you need to run Disk Utility to create an APFS partition to install the macOS Mojave.
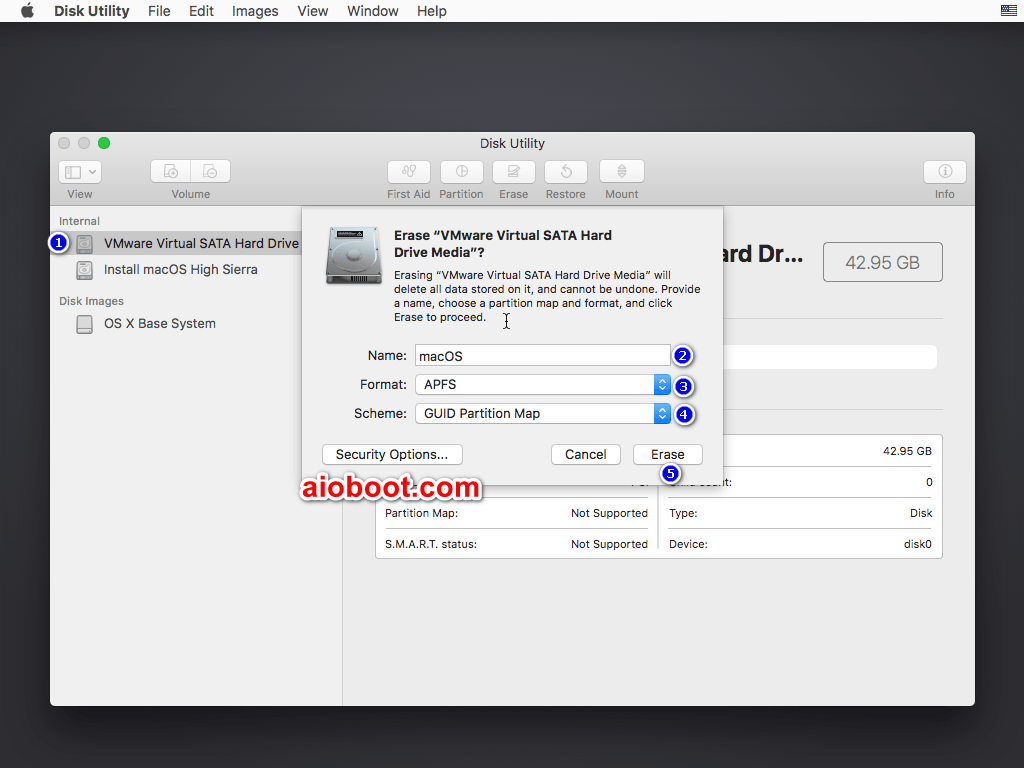
- In the left column, you will see the virtual hard disk you created above (VMware Virtual…). Select it and click the Erase button.
- Under Name, enter a name for the new partition.
- macOS Mojave requires a partition in APFS format for installation. Select APFS from the Format drop-down list. For older versions, select Mac OS Extended (Journaled).
- Click the Erase button to continue.
- Once you have an APFS partition, close Disk Utility to start installing macOS.
Go back to the macOS Utilities screen:
- Select Install macOS and then click the Continue button.
- Continue to select Continue, then Agree and Agree.
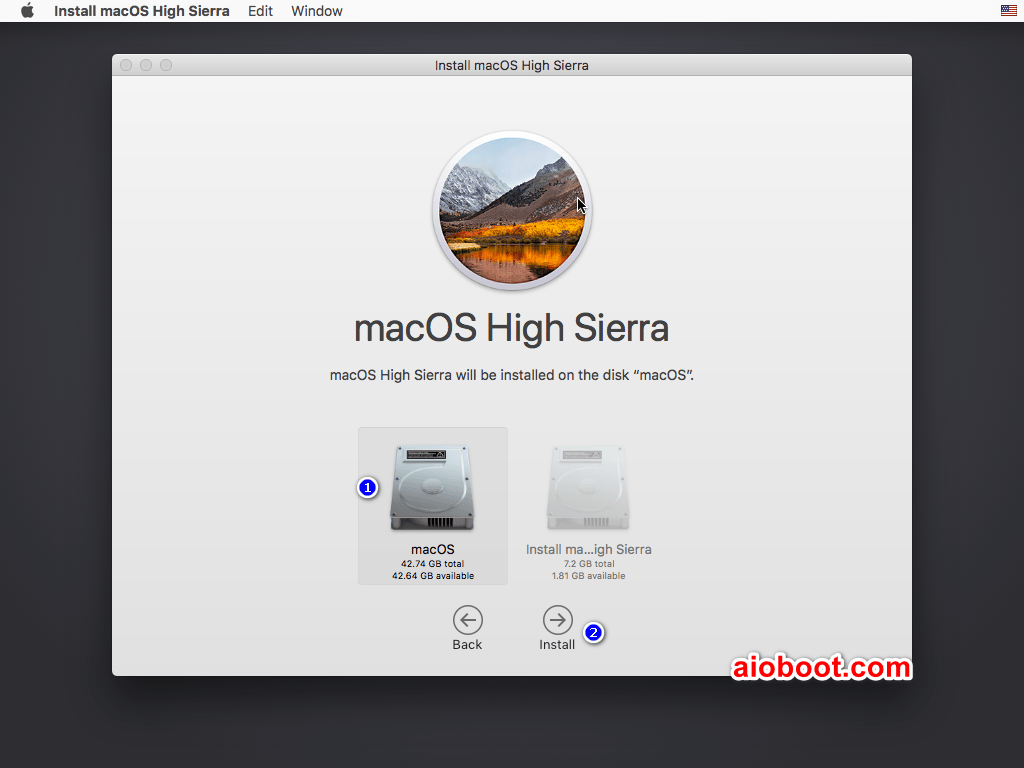
- In the next window, select the APFS partition you created above. Then click Install to install macOS Mojave on VMware Workstation.

- The virtual machine will restart several times until it allows you to set up. Please be patient.
Once installed, you can remove the virtual hard disk that you added in the Add macOS image step. Open Virtual Machine Settings, select the disk and click the Remove button.
Install VMware Tools
It is very important that you install VMware Tools in the virtual machine. Installed VMware Tools will improve the performance and support for additional features. Learn more about installing VMware Tools for the macOS virtual machine at VMware’s Web site.
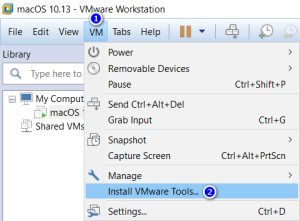
- Select the VM from the VMware menu, then select Install VMware Tools…
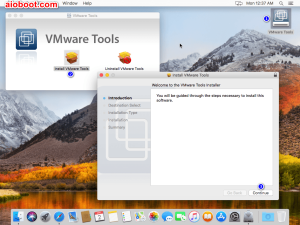
- VMware will automatically mount the darwin.iso file and the VMware Tools icon will appear on the virtual machine screen. Double click on this icon to install.
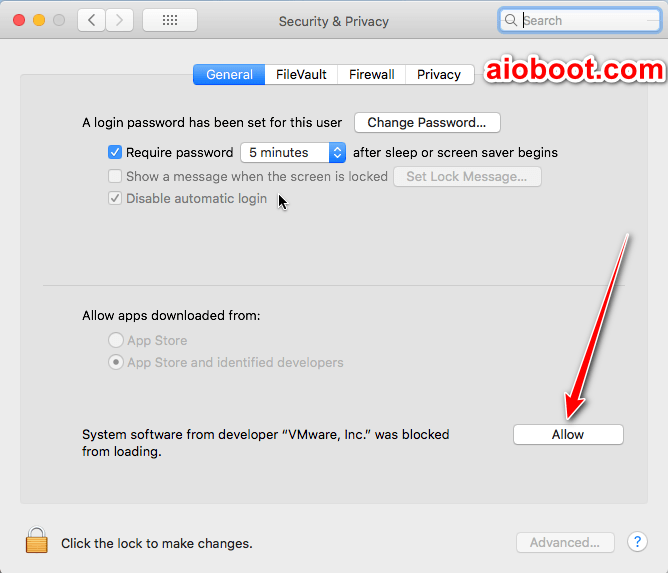
- Click the Open Security Preferences button if you see the message “System Extension Blocked“.
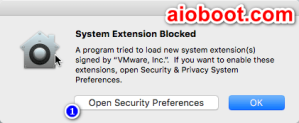
- You will see the message “System software from developer “VMware, Inc.” was blocked from loading.“. Click the Allow button.

- Restart the virtual machine.


So you have finished installing macOS Mojave on VMware Workstation. Good luck!
Hi, It is not completing the installation, I change the date, also connect to internet after the installation has started, but when it is like 80% done I get the error: “An error occurred validating the installer data. The download is either damaged or incomplete” and in the very last log it says: “Stop operation queue with Error Domain=com.apple.osinstallersetup.LinkFileDownload Code=8”. Some had this issue?
Very good, thank you sir!
After install… You change date again in settings. That´s all folks (this come from Basque Country).
You are not very clever… Antes de instalar desconéctate de internet y cuando hagas el paso de borrar el disco y toque instalar, antes de instalar cambia la hora (sorry change date) en utilidades (consola de comando; parecida al CMD de Windows) porque el certificado esta caducado … pon ´date 010101012018´ para Mojave ´enter´ y exit ´enter´… Vuelves a la pantalla de instalación.. Selecciona Instalar… espera 1 minuto y vuelves a conectar internet… y continuará.
You´re stupid… Antes de instalar desconéctate de internet y cuando hagas el paso de borrar el disco y toque instalar, antes de instalar cambia la hora en utilidades (consola de comando; parecida al CMD de Windows) porque el certificado esta caducado … pon ´date 010101012018´ para Mojave ´enter´ y exit ´enter´… Vuelves a la pantalla de instalación.. Selecciona Instalar… espera 1 minuto y vuelves a conectar internet… y continuará.
En la modificación del archivo ´config.ini´ (si error), hay que poner estas comillas ´smc.version =”0″´ (Shift+2); si se ponen estas ´smc.version =“0”´, aparecerá el mismo error en ejecución.
just buy a mac lolol
Eres un gilipollas… antes de instalar desconéctate de internet y cuando hagas el paso de borrar el disco y toque instalar, antes de instalar cambia la hora en utilidades (consola de comando; parecida al CMD de Windows) porque el certificado esta caducado … pon ´date 010101012018´ para Mojave ´enter´ y exit ´enter´… Vuelves a la pantalla de instalación.. Selecciona Instalar… espera 1 minuto y vuelves a conectar internet… y continuará.
You buy a mac lololol
The repository is not availlable. Where can i download de unlocker?
https://web.archive.org/web/20190723174553/https://github.com/DrDonk/unlocker
I found it here;
https://github.com/paolo-projects/unlocker
I got as far as clicking on “install macOS Mojave” and its telling me that the install is damaged. Any ideas?
I ran into the same exact issue.
Desconecta internet despues de instalar ´VMware unlock´y continua con la instalacion y configuracion de Mac OS hasta la ventana de ´disk utilities´… borrar como dice el tutorial, volver y antes de ´install mac os´ en la pestaña superior, cambia la fecha en la consola de comando, porque el certificado esta caducado; pon ´date 010101012018´, vuelve a ´install macOs, selecciona, espera un minuto y conecta internet… instalarà hasta el final… despues vuelve a poner la fecha correcta (from Basque Country) .
Disconnect internet after installing ´VMware unlock´ and continue with the installation and configuration of Mac OS until the ´disk utilities´ window … delete as the tutorial says, go back and before ´install mac os´ in the top tab, change the date in the command console, because the certificate is expired; put ´date 010101012018´, go back to ´install macOs, select, wait a minute and connect the internet … it will install until the end … then put the correct date again (from Basque Country).
Disconnect internet after installing ´VMware unlock´ and continue with the installation and configuration of Mac OS until the ´disk utilities´ window … delete as the tutorial says, go back and before ´install mac os´ in the top tab, change the date in the command console, because the certificate is expired; put ´date 010101012018´, go back to ´install macOs, select, wait a minute and connect the internet … it will install until the end … then put the correct date again (from Basque Country).
Disconnect internet after installing ´VMware unlock´ and continue with the installation and configuration of Mac OS until the ´disk utilities´ window … delete as the tutorial says, go back and before ´install mac os´ in the top tab, change the date in the command console, because the certificate is expired; put ´date 010101012018´, go back to ´install macOs, select, wait a minute and connect the internet … it will install until the end … then put the correct date again (from Basque Country).
HAVE A GOOD DAY!
As Qbaze pointed out, the certificate has expired. Their workaround will help you out here;
disable internet access from vmware
go to terminal and change date i used “date 110913122018”
quit terminal and try it again.
Apple always puts some kind of certificate that expires after a few months.
My mouse and keyboard do not work inside my VM, I am using VMWare 14 on an AMD CPU, any ideas?
Besides that it boots perfectly
Does MacOS Unlocker comprimise future VMWare Workstation Updates?
Works flawlessly on vmware 15, windows 10
Not working for version : 15.5.1 build-15018445
Get Errrormessage this version of Install is damaged.
When i install it says “this copy of the install macos mojave application is damaged and cant be used to install” I have already downloaded the file twice. someone please help
am Getting error
This copy of the install mac OS Mojave application is damaged , and can’t be used to install macOS
help me !!!!!
If you can’t fix this error by the tuorial:
VMware Workstation unrecoverable error: (vcpu-0)
vcpu-0:VERIFY
vmcore/vmm/main/physMem_monitor.c:1279
try to add smc.version = “0” line to the VMware virtual machine configuration at installation folder of your virtual machine (in my case it’s named macOS 10.13 look to the “Type” column in explorer)
I have finished all
after pressing install macosx
it shows an error the the file is damaged..
how to fix
disable internet access from vmware
go to terminal and change date i used “date 110913122018”
quit terminal and try it again.
Apple always puts some kind of certificate that expires after a few months.
thankyou this workedkunwarsagarasmh
thankyou this worked
Thanks. This date command worked for me.
Hi ! Could you be more specific ? Which terminal ? Where i can find date ?
Thx !
HOW TO DO THIS KINDLY ELABORATE TNX
Thanks Qbaze! (for the internet disabling and terminal date changing tip to make the installer work).
Thanks article writer and aioboot!
The unlocker github has gone, but you can find the unlocker download here:
https://techsprobe.com/download-macos-unblocker-vmware/
(which links to:) https://drive.google.com/file/d/1-onzEYgFPXpfCVggUY3AR-EaC0OIffaD/view
VMDK from this article + unlocker from techsprobe above + Qbaze Fix + VMWare Workstation 15.1.0
= MacOS Mojave is currently installing on the Virtual Machine!
Thanks all!
Thanks Qbaze, this worked pefrectly.
Thank you! Worked perfectly.
relax bro i thought the os is corrupt no its not
start by changing your date on your windows machine to 2018-12-13 and time to 11:09 but anytime should work
and disable all ur internet adapters
then start everything from fresh it should work
thanks admin for the tutorial i managed to install after i face some errors like os damaged
Follow this video. It helped me to fix that issue.
1. Disabled the internet connection.
2. Change the date to 2016.
https://www.youtube.com/watch?v=57aA8e9YQSg
Hi, after erase of HDD and i click on “install Macos” i keep on receiving message “this copy of install macos mojave application is damaged etc.” how can i fix it ?
Workstation pro 15.5
OS: Windows 7 x64
Thanks
Your steps were fantastic, but may I suggest an improvement?
Change this:
“Go back to the macOS Utilities screen:
Select Install macOS and then click the Continue button.”
To this:
“Go back to the macOS Utilities screen:
Close the Disk Utility window to go back to the maxOS Utilities screen.
Select Install macOS and then click the Continue button.”
This was my first time installing Mac OSX, so it took me a while to get past this step.
Thank you!
If you get the following message in vmware.log: –
vcpu-0| W115: DarwinPanic: panic(cpu 0 caller 0xffffff8000715250): initproc exited — exit reason namespace 2 subcode 0x4 description: none
try adding this to your vmx file: –
cpuid.1.eax = “0000:0000:0000:0001:0000:0110:1010:0101”
It seems I had to do this because I had a crappy Celeron N2830 CPU (Macs never got them), and this fakes a Xeon.
I encountered this question,tell me where is vmx files please?
The Disk Utility doesn’t seem to recognize the 128 gig virtual hard disk mounted in VMWare. Did I miss a step?
Vm tools don’t work. You forgot the source. Bad tutorial!
Still working for me after upgrading to VMware Workstation Pro 15.5.0 build-14665864 on Windows 10 – 1903 Build 18362.356
work for me.
Thanks man
Note that unlocker does not enable MacOS for VMware Workstation 15.5 Pro 15.5.0 build-14665864. Host OS: Windows 10 Pro Version 1903, Build 18362.356
I’m seeing the same problem, it does not show Apple/MacOS as a choice in the dialog box for creating the VM. 🙁
Anyone tried this with VMware Workstation 15.5 Pro?
2 issues,
1. unlocker doesnt find the darwin tar file, guess paths have changed? (I just downloaded the lates one manually)
2. even though it says successfully patched, mac os x does not show up as an option in “create new vm”
Worked fine on version 14.x – same machine
edit: forgot some details
Host OS: Windows 10 Pro 1903 build 18362.356
VMware Workstation 15.5.0 build 14665864
Mine isn’t working on 15.5 Pro… the script is looking for a file that doesn’t exist.
Sadly, the Unlocker seems to not work with versions that higher than 15.1.x
Reinstall the ealier version, everything works.
It doesnt work on VM Workstation 15.5
Yep – get a build with fixes from https://github.com/paolo-projects/unlocker. That will fix it. Expect Windows security to quarantine unlocker.exe – you’ll need to restore it and tell Windows security it’s safe.
Hi there!..when I installed unlocker then it’s showing some error like failed to patch vmware.dll although I gave Admin permission..
Please check out my problem.
this article really helped me …
All step by step information guided me completely.
Thank you
anyone had problems with connecting to internet ?
I did.
smc.version = “0”
cpuid.0.eax = “0000:0000:0000:0000:0000:0000:0000:1011”
cpuid.0.ebx = “0111:0101:0110:1110:0110:0101:0100:0111”
cpuid.0.ecx = “0110:1100:0110:0101:0111:0100:0110:1110”
cpuid.0.edx = “0100:1001:0110:0101:0110:1110:0110:1001”
cpuid.1.eax = “0000:0000:0000:0001:0000:0110:0111:0001”
cpuid.1.ebx = “0000:0010:0000:0001:0000:1000:0000:0000”
cpuid.1.ecx = “1000:0010:1001:1000:0010:0010:0000:0011”
cpuid.1.edx = “0000:1111:1010:1011:1111:1011:1111:1111”
featureCompat.enable = “FALSE”
usb_xhci:4.present = “TRUE”
usb_xhci:4.deviceType = “hid”
usb_xhci:4.port = “4”
usb_xhci:4.parent = “-1”
vmware workstation 14 pro
Host OS Version: Windows 10, 64-bit
Guest OS: macOS Mojave 10.14.4
Memory: 8GB
After Installation ist the resolution from Monitor only 1024×768
So I have all installed and after installing VMWare Tools, I got on the desktop with a full resolution (1920 x 1080). But it did not last long and the resolution is going back automatically to the other option : 1024y768 I restarted but no change.
I did this from some other guide but still the same issue
Go to System Preferences -> Security & Privacy -> General tab and if there is anything for VMware to allow, click Allow
For AMD processors if you are facing issues during the first boot of the VM:
a) Edit the macOS 10.14.vmx file using a text editor and add the following to the end:
cpuid.0.eax = “0000:0000:0000:0000:0000:0000:0000:1011”
cpuid.0.ebx = “0111:0101:0110:1110:0110:0101:0100:0111”
cpuid.0.ecx = “0110:1100:0110:0101:0111:0100:0110:1110”
cpuid.0.edx = “0100:1001:0110:0101:0110:1110:0110:1001”
cpuid.1.eax = “0000:0000:0000:0001:0000:0110:0111:0001”
cpuid.1.ebx = “0000:0010:0000:0001:0000:1000:0000:0000”
cpuid.1.ecx = “1000:0010:1001:1000:0010:0010:0000:0011”
cpuid.1.edx = “0000:1111:1010:1011:1111:1011:1111:1111”
featureCompat.enable = “FALSE”
b) Next, locate the entry virtualHW.version = “16” and change it to irtualHW.version = “10”
c) Then save.
d) Start the VM again.
I’m stuck in Apple Logo… any idea?
same
I want to say, your article is awesome and your method was worked out for me
I need to set this up, but before I do is the version of MacOS the latest (the one with apple news plus), I would hate to install only to find out it is an old version.
Help with this error:
Error popup: The CPU has been disabled by the guest operating system. Power off or reset the virtual machine.
Error message: Unable to process CD-ROOM device ‘G:’: The system cannot find the path specified.
I am having issues with bridging on VMware workstation pro 15 and mac osx 10.14.2…
Please see my post:
https://www.reddit.com/r/hackintosh/comments/b6el93/vmware_workstation_15_pro_bridging_network_issues/
For complete details.
Thanks.
VMware Workstation Pro 15 Pro
Version: 15.0.2 build-10952284
Host OS Version: Windows 10, 64-bit (Build 17763) 10.0.17763
Guest OS: macOS Mojave 10.14.4 Beta (18E205e)
Memory: 8GB
Thank you for your instructions. Everything works great until it comes to installing the VMware Tools. When I try to install it comes up with this error:
“Could not find component on update server. Contact VMware Support or your system administrator.”
I had accidentally turned on the updates for developer versions but the error was before, and after, the update.
I run a lot of windows and Linux (mainly CentOS for work) VM’s and this is the first Mac VM. Am I just out of luck for VMware tools unless I am running a MAC as my Host OS with VMware Fusion?
BTW, Thank you for these instructions, they are the only ones on the web I could find that worked.
Hello,
I was ready to post to say how everything went well, but…something is not ok. However thanks a lot for the whole process described here, it is great.
So I have all installed and after installing VMWare Tools, I got on the desktop with a full resolution (1920 x 1080). But it did not last long and the resolution is going back automatically to the other option : 960 x 540 (HiDPI). Default option gives the same result than “scaled”. I restarted but no change.
Does someone have a solution for that?
Thanks again 🙂
Olivier
Ok I found the solution, it is in the settings, Display, untip the display scaling. Sorry for that.
Olivier
Hi
after I added installer hard drive
when I start VM It pops up this error:
Unable to open file “K:\Virtual Machines\macOS 10.14\OSX_10.14.0_Installer.vmdk”:
Insufficient permission to access file.
Try running the VM under admin.
Permission denied: u’C:\\Program Files (x86)\\VMware\\VMware Workstation\\vmwarebase.dll’
[13244] Failed to execute script unlocker
What to do now?..can anyone tell me the solution I really need it.
Hi Tu, thx. But how is it with an existing appleid? Can it be used or set a new appleid?
It works fine with my existing Apple ID. I have never owned a Mac before so my Apple ID was only for my iPad and iTunes.
Hi Tu!
Great tutorial, thanks a lot.
Everything worked nicely, but for some reason except for HLS on Safari – it fails to play natively, while the same links work just fine on MacBook, for instance.
Safari complains about “Unsupported Plug-in”, also QuickTime fails to play HLS URL’s, which is probably related…
Example URL:
https://bitdash-a.akamaihd.net/content/MI201109210084_1/m3u8s/f08e80da-bf1d-4e3d-8899-f0f6155f6efa.m3u8
Any ideas/suggestions how to make it work?
Cheers,
WS.
having the same problem. did you find a fix?
Sadly, no. I had to use MacBook…
Thanks for a great template, but i cant boot the vm into OSX, it hangs on apple symbol.
Running Workstation 15.0 on Ubuntu 18.04 host. I execute the lnx-install.sh successfully . and create the vm like your work.
This is the ONLY instructions that actually works the entire phreaking web, atleast for Mac OS X 10.14 Mojave and VMware Workstation 14.x.
All the other instructions misses that you have to create a APFS disk before installing… 🙂
Thanks!
Thanx very much!
Very useful!
Your website / instructions is the only one to solve the VMware 14 issues I’ve been having. Your updated Patch tools was the solution. Install worked perfectly. You only have to add the smc info in your MacOs.vmx file.
Kudos!!!!
Thanks so much for this, it worked great! I have spent hours and hours trying to get Mojave running in a VM, and tried many other Web sites’ instructions, with no luck. Yours worked! Thanks again.
It is hard to download OSX_10.14.0_Installer.vmdk with FreeVPN in China
This worked flawless. no errors. Followed The Guide Carefully… Thanks alot.
Used VMware® Workstation 15 Pro 15.0.0 build-10134415
Windows 10 PRO x64
VMWS Settings for mac .. 8GB RAM 2CPU
Hello;
I can’t find macOS 10.13 after installing VMware macOS Unlocker on Win10.
Excellent TU NGUYEN!
I have been trying to get a macOS VM working for some time but your instructions and the links to the resources made it very easy.
I followed the instructions and all worked fine. A couple of prompts were different but nothing particularly noteworthy, (e.g. there was a warning about a sata0:1 device but I cancelled that after the install).
After install the first reboot and 100% progress bar nothing seemed to be happening for some time so I restarted the VM and all was then OK.
Performance seems better than I expected but I have not tested anything heavy yet (, host: Windows 10, Intel Core i7-4500U @1.8GHz, 8GB RAM, SSD).
Updates to macOS 10.13.6 worked fine.
Working config:
Windows 10 Pro, Version 1083, OS Build 17134.112
VMware® Workstation 14 Player, 14.1.2 build-8497320
VM settings:4GB RAM, 2vCPUs
Thanks for the great post!
Congratulations. Pleased with this.
when i try to play virtual machine an error pops up “One of the disks in this virtual machine is already in use by a virtual machine or by a snapshot.”
what do you think is the problem?
Exit all applications running on this disk or using this disk.
Excellent !!! Worked 1st time !!! Thank You. Struggled 9 days with Vitualbox ….. Why I don’t know… Since I am a VMWare expert !!! LoL …. Leanding ears out to other suggestions !! Now I am going to try it on VBox too ….. Cheers !!
I tried VirtualBox but it does not work, anything doing it works let me know please.
“This virtual machine required AVX2 But AVX is not present. This virtual machine cannot be powered on.”
i have this error msg pops up.
using vmware workstation 14 , on AMD ryzen 2200G (support AVX & AVX2) both enable checked using CPUZ
Hi
When I Go back to the macOS Utilities screen and Select Install macOS and then click the Continue button to get the Install macOS High Sierra window and then click Continue on that, I get a message box saying “The recovery server could not be contacted”
I have no idea what that signifies but I am connected to the internet.
Thanks
Dave
I think the time settings on your computer or virtual machine are incorrect.
Thanks, but the time (UTC) is the same on both.
Hi
I have just found that the reason for the “The recovery server could not be contacted” message was that I had Network Connection set to Nat.
I changed it to Bridged and set Replicate physical network connection state on.
Now it is installing High Sierra
Thank you for letting me know that.
hey!
thanks for your post! I have a problem when i click on instal. It says “The recovery server could not be contacted”.
Any help with that?
THANKS!
It seems the time on the computer is not correct.
I got a message saying “The CPU has been disabled by the guest operating system. Power off or reset the virtual machine.” how do I fix it??
You can use Google Search.
will it still read the devices that are plugged in in the virtual machine?
Yes.
and will it work with the trial of vmware workstation 14?
Yes.
It seems that at the end screen, when we should wait for the install to complete, the installer want to download 5.1 GB !
Restart your virtual machine.
I restarted my virtual machine but the same process will be repeated and the installer always start downloading 6 packages (~5.1 GB)
I don’t know, but you can try disconnecting the network on the virtual machine.
unmounting disk
could not unmount disk
operation Failed
disk erase error