
PartIMG Mapper has the same features as Partition Image Mapper, but it runs directly on Grub2 and Grub4dos without Windows.
Introduction
Partition Image Mapper is a tool that allows you to temporarily use the partition image as a real partition. PartIMG Mapper is similar, please refer to Partition Image Mapper for more details.
PartIMG Mapper is designed to help users to use it directly on Grub2 without having to boot into Windows. This is a Grub2 menu, but it does use Grub4dos to do some work. But Grub4dos does not support UEFI, you need to boot into Grub2 in Legacy BIOS mode to use this menu. And PartIMG Mapper only supports MBR disks, not GPT disks. The advantage of it is that you can use it directly from the Grub2 menu without having an operating system.
PartIMG Mapper supports ISO files, which can help you boot most Linux operating systems from ISO.
However, it is possible that the Linux distribution you want to boot supports booting from the ISO file. From the main menu of Grub2, press the j key to access the “Boot from ISO, WIM, IMG, VHD and IMA files” menu. If the ISO file is supported here, you do not need to use the PartIMG Mapper menu.
This menu is only visible on USB. If you want to use on HDD, please create a file named FORCEHDD in folder /AIO/Tools.
PartIMG Mapper
First, you need to copy all the PartIMG and ISO files into the /AIO/Files/PartIMG folder. Next, you need defrag for this folder, I use Defraggler Portable to do this.
Now just boot into Grub2 in Legacy BIOS mode and access the PartIMG Mapper menu. Press the o key for quick access to this menu. It will list all the files in the /AIO/Files/PartIMG directory.
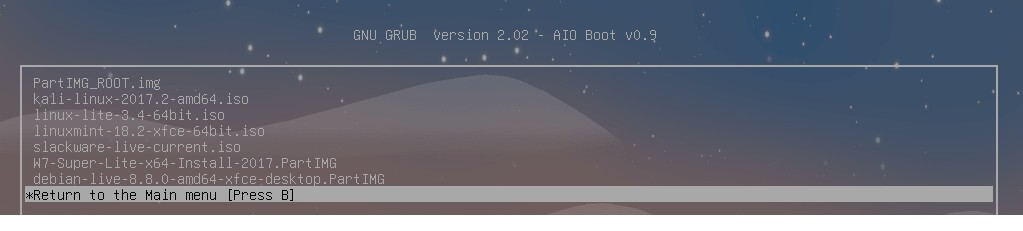
Select the files you want to use as a real partition. From the Grub2 menu, press the n key to access the Partition Tools menu. You will see all the partitions on this disk.

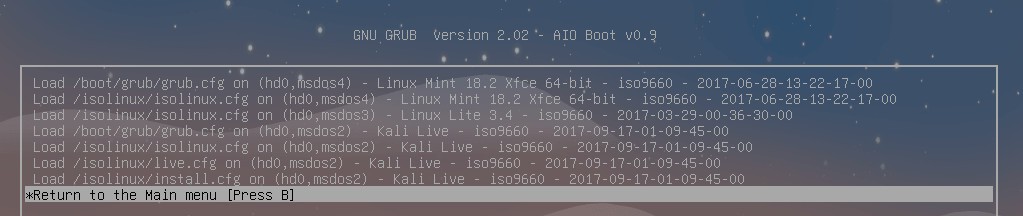
To boot into partitions from the PartIMG and ISO files, from the Grub2 main menu, press the k key to access the PartIMG Partition menu. Here you will see the partition or configuration files such as grub.cfg, isolinux.cfg and syslinux.cfg. Select one of the partitions or configuration files to boot. If one of them can not boot, please choose another.
Once you have used these partitions, you should delete them.
Overlapping partitions
Some operating systems like FreeBSD, NetBSD… do not allow overlapping partitions. This means that the beginning of this partition is part of another partition. To fix this, simply delete the partition where you are putting the ISO and PartIMG files.
If you install AIO Boot on multiple partitions, from the main menu of Grub2, press the y key to set another partition as the root partition. Or use the PartIMG Mapper menu to MAP the PartIMG_ROOT.img file as a new partition and set this partition as the root partition. Okay, now you can delete the partition where you are putting the ISO and PartIMG files. Note: Do not forget to Back up MBR to restore the partition later.
Windows
For the Windows ISO file, you need to convert it to a PartIMG file using AIOCreator.exe.
For HDD, skip the steps below. For USB, Windows only shows the first partition. PartIMG Mapper will use the empty partitions in order. Therefore, you need to MAP the PartIMG file first.
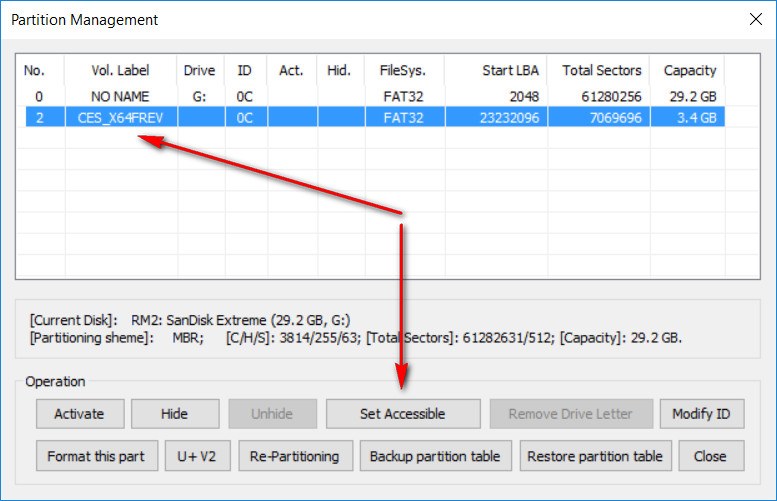
From the main menu of Grub2, press the n key to access the Partition Tools menu. Here you will see all partitions named hd0,msdosX. X is the partition number in the partition table. If the partition number of the Windows partition is larger than the partition number of another partition in the list, that means the Windows partition is located behind and will be hidden by Windows. hd0,msdos1 is the first partition and hd0,msdos2 is the second partition on the disk. To change partition numbers of partitions, run AIOCreator.exe -> Tools -> Partitions Manage, select the hidden partition in the list and click Set Accessible.
You only need to do this once. You can later delete this partition to use for other Windows PartIMG files. You can also delete all partitions located before it in the Partition Tools menu.
Tôi có thể chạy được file chromeos.img trực tiếp ko? thank ad