
Partition Image Mapper is a tool that allows you to temporarily use the partition image as a real partition.
Introduce
A partition is located on the hard drive based on the starting address and the total size of the partition. And a file too, it also contains information about the start address and its size. So there are many tools that support backing up a partition into a partition image file. You can then restore the partitions from the partitioned image files that were backed up as before.
Currently there are many operating systems like FreeBSD, GuixSD … provide a disk image of USB instead of an ISO. Normally we would have to write this file to USB via dd or Win32 Disk Imager. The downside here is that all partitions and data on the USB disk will be lost.
Also, some Linux installers such as Ubuntu Server, Debian and Kali Linux do not support specifying the path of system files on the USB. This forces you to write your files to the USB root directory. However, many Linux distributions are based on another distribution. For example, Kali Linux based on Debian, they have a similar directory and file structure. And of course, we can not have both distributions in the same partition at the same time because the files will be overwritten.
Partition Image Mapper was created to solve all of the above problems.
How does it work?
Partition Image Mapper only works for valid partition images, any other file types will not work.
First, this tool will check the start and end of the partition image that you have selected. Then it will update the partition table information, now the partition image is the real partition. The partition table information (in MBR) will be backed up and you can restore the partition table information at any time. So the advantage of this tool is that existing data will not be lost.
The partition image file is the file that you backed up from the partitions. Or extracted from the image of the USB disk. Or created from AIO Boot.
- If the file you downloaded is an image of the USB, just use 7-Zip to extract the partition image file.
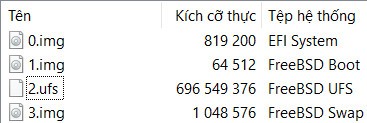
This is a partition image included in FreeBSD’s memstick.img file. You only need to extract the 2.ufs file. - If the ISO file is not supported by AIO Boot, like Ubuntu Server, Debian installer and Kali Linux installer… AIO Boot can help you create a partition image file (PartIMG).
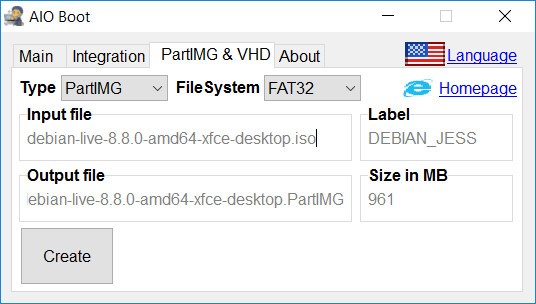
The partition image created by the AIO Boot is called PartIMG.
Partition Map Mapper latest version supports MAP file ISO. Most Linux ISO files are supported. For Windows ISO files, you need to convert it to a PartIMG file.
MAP
- Copy the PartIMGMapper.exe file from the USB drive to another drive. This file is not allowed on target disk.
- Copy the partition image you want to USB.
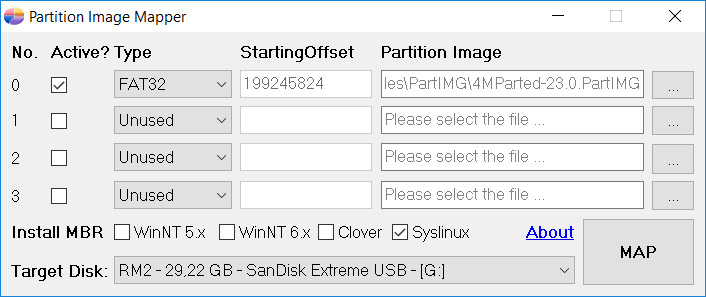
- Run PartIMGMapper.exe.
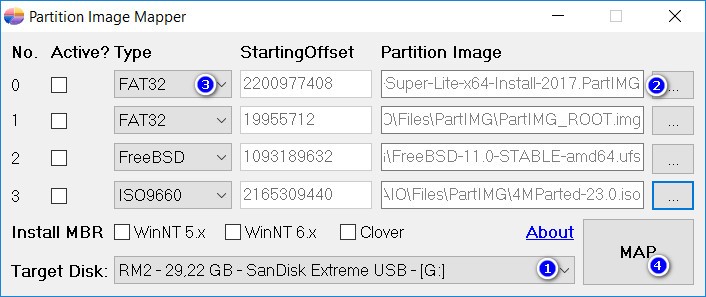
- Target Disk: select the target disk device.
- Select /AIO/Files/PartIMG/PartIMG_ROOT.img at 1. This is the partition image of Grub2, which will automatically identify and boot to other partitions. If you get an error, maybe this file is not contiguous, please defrag the file and try again.
- Select the other partition image files in the remaining 3 sections.
- In the Type section, you need to select the correct format of the partition image. For example FAT32, NTFS, Ext4…
- Click MAP button.
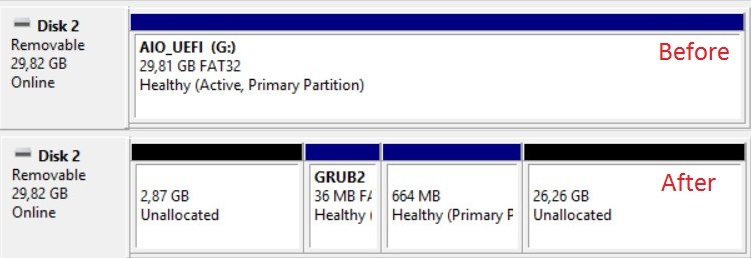
- If successful, you will see the new partition, can use the Disk Management to view the partition.
- The tool will back up the partition table information for later restoration. The file has .MBR extension in the same directory as PartIMGMapper.exe.

- Boot into USB, then you can find and boot into the MAP partition from the PartIMG Partition menu (press the k key for quick access).
Note:
- For Windows partition images, you need to put it in row 1.
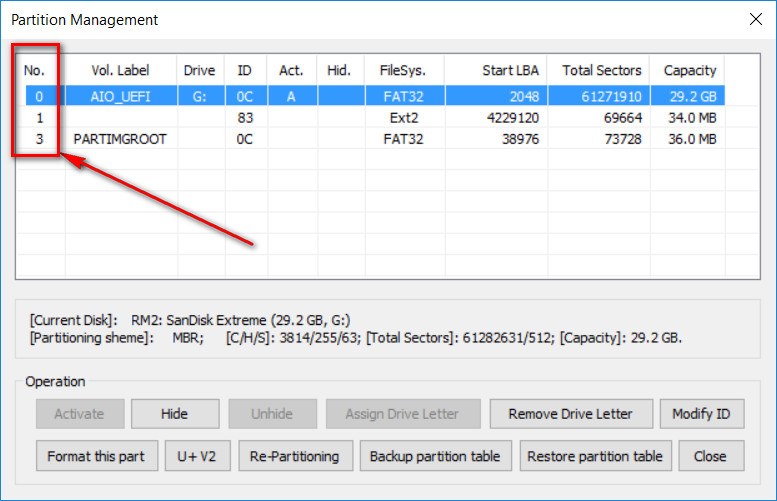
- You can keep existing partitions on disk. You can check the existing partitions and their partition numbers in the Parts Manage in BootICE. Or run AIOCreator.exe -> Tools -> Partitions Manage. In the Type of Partition Image Mapper, choose Keep for the partitions you want to keep.
UNMAP
After you’ve done the work with the partition image, you can restore the partition as it was.
- Run PartIMGMapper.exe.
- Click the UNMAP button and select the previously backed up MBR file.
MBR
Partition Image Mapper also supports MBR installation including WinNT 5.x, 6.x, Clover and Syslinux. Installing the appropriate MBR will allow you to boot directly into the partition you want in the second stage.
- WinNT 5.x, 6.x and Syslinux: Search the ACTIVE partition and boot the PBR.
- WinNT 5.x is designed to boot the PBR with the NTLDR installed, which is used for Windows XP and earlier versions.
- WinNT 6.x is designed to boot PBR with the BOOTMGR installed, which is used for Windows Vista and later versions.
- MBR of Syslinux should be used if the partition has Syslinux installed. Syslinux is used mostly in Linux distributions.
- Clover: Search the partition where you installed Clover. This partition does not need to be ACTIVE.
Here I use the partition image of 4MParted. With Syslinux installed, I will select this file as the first partition and select ACTIVE. I also chose to install MBR as Syslinux. After MAP, I will be booting into the ACTIVE partition, here is the partition of 4MParted.
PartIMG Mapper
PartIMG Mapper has the same features as Partition Image Mapper, but it runs directly on Grub2 and Grub4dos without Windows.
You can do everything Partition Image Mapper can do, including Backup MBR, Restore MBR. By using the Partition Tools from the Grub2 menu, you can delete the partitions that you have MAP from the ISO or PartIMG file.
Good luck. Leave a comment if you have any questions.
How well does this work with a “standard” MacOS installer, the kind of thing you’d run from Clover to install MacOS on a hackintosh?
Windows 10×64 is 4.72gb in size. How can I boot this in uefi?
You need a FAT32 partition. The tool will split the file into several parts to store on a FAT32 partition.
how to download it…
cant run it on PC with windows 10. i get error the device is not supported. what can i do ?
Hi,
It only supports removable devices like USB.
It tells me “you need to select the files on disk3” and I have no idea what it means.
Hi, open Disk Management, and you will see the drives on disk 3.
This means that you need to copy the files into these drives first.
https://i.imgur.com/EXbwzXD.jpg
Then it tells me “There is something error happened. Please try again or contact the author for assistance”. I am trying to install Mac OS on PC.
Hi, try to clean and recreate new partition https://github.com/nguyentumine/AIO-Boot/issues/15
Sorry I didn’t get it, why do we need to mount a partition like that? Also Linux/BSD FS wouldn’t be accessible through Windows!
Because it’s a partition image, these operating systems may not work in the usual way. You also do not need to access BSD partitions from Windows, this is not necessary.
It says “If the ISO file is not supported by AIO Boot, like Ubuntu Server, Debian
installer and Kali Linux installer… AIO Boot can help you create a
partition image file (PartIMG).”
Okay, how could AIO Boot use that .partimg/vhd to boot from?
This file will be MAP and used as a real partition.
Just install Syslinux on that partition and boot into it.
I see, and that’s just works with Syslinux boot loader! and AIO Boot going to create a boot entry for that IMG…