
AIO Boot supports multiple Windows installers in one USB/HDD. This article will help you choose one of two methods that are more suitable for you.
How does it work?
An ISO file of the Windows installer will contain the necessary files for the installation. Include bootloader files, menus, WinPE and Windows version images. AIO Boot already includes Windows bootloader files and menus. Here we only need two important files in the ISO file.
- source\boot.wim:
This is a WinPE, a small operating system that includes the installer and tools for installing Windows. First we will boot into this small operating system then the installer will start. - source\install.wim:
The installer will look for images of Windows editions, which by default are in source\install.wim or source\install.esd.
AIO Boot will modify the boot.wim file to interfere with its working steps. Or we will direct the path of the install.wim file. Or mount the Windows ISO file and let the installer work its way.
Advantages and disadvantages
Here are the advantages and disadvantages of two methods using ISO and extract install.wim.
- The size of install.wim is smaller than the ISO file, so it will save your disk space.
- You can save the install.wim file on the FAT32 partition if its size is less than 4GB regardless of its ISO size.
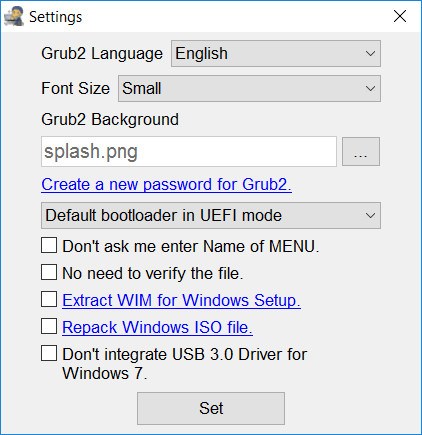
By default, the AIO Boot will use the Windows ISO file instead of the install.wim file. To switch to using the install.wim file, run AIOCreator.exe > Settings, select “Extract WIM for Windows Setup.” and Save.
USB 3.0 Driver for Windows 7
The original Windows 7 ISO file from Microsoft will not support USB installation if you plug it in port 3.0 because it does not contain the USB 3.0 driver. By using AIO Boot to create USB Windows 7 installation, the USB 3.0 driver will be automatically integrated. If your ISO is already integrated, enable the “Do not integrate USB 3.0 Driver for Windows 7” option.
Autounattend.xml
AIO Boot supports Autounattend.xml for every Windows installation, regardless of the ISO file that does not contain the Autounattend.xml file. Just copy the file Autounattend.xml or Unattend.xml into the /AIO/Files/WinSetup/XYZ directory, same directory as the boot.wim and ISO files.
Menu
Some users wonder that they do not see the menu to boot into Windows/WinPE after Integration. AIO Boot only shows the WinPE & Setup menu if your system supports booting it.
You can only boot WinPE 64-bit on UEFI 64-bit and WinPE 32-bit on UEFI 32-bit. AIO Boot checks the WinPE architecture (boot.wim) to add the appropriate menu. Although Windows AIO contains 32-bit and 64-bit images for installation, its WinPE (boot.wim) can only be 32-bit or 64-bit.
window 7 install network path problem ,help me
its always asking for network path
If you are booting from Network, you need to enter Network Path to find the ISO file.
AIOBOOT NOT SUPPORTING INSTALL.SWM SPLITED FILE
Tried to create multiple Windows 8.1, 10, Linux manjaro but in ‘Integration’ after checking file…. then gave me Error message.
What should I do, please guide me to the right path.
I would like to ask a question about the “winPE&setup” option.
Because I follow the AIOboot YOUTUBE channel
https://www.youtube.com/watch?v=ijuiJP8ijvg
The method is completed and simulated start (click “winpe&setup” during the simulation to enter the “Windows boot management” page).
However, after I started the real machine, I chose the “winpe&setup” entry.
The following screen will appear
Unable to upload image
The link is here: https://i.loli.net/2019/04/25/5cc121b4abf45.jpg
I tried \EFI\Microsoft\Boot on a USB device
Location copied a BCD file
Restart to select the “winPE&setup” entry
Will skip “windows boot management” directly
Direct access to the Windodws10 system
I don’t know what the reason is?
I hope I can help me.
Thank you
Tried using unattend.xml and autounattend.xml but it does not use the file. Placed it together with the splitted ISO file. Can I edit a run command for the windows setup to force it to load the unattend file?
I tried both on fat32 and ntfs and both on UEFI and BIOS boot. If I put the file inside the ISO it does work.
I am unable to make autounattend.xml work with windows 10. If i add it to the iso it does work. If put in the same folder as the ISO it doesnt use it. Tried both on ntfs and fat32 with booth uefi and bios, have latest october version.
Hello,
I created a linux-based iso from Acronis true image 2018 with Acronis True Image 64/32 bit, Acronis system Report 64/32 bit, Acronis Universal Restore 64/32 bit and Acronis Disk DIrector 64/32 bit.
Impossible to integrate it refuses and tells me to contact the developer.
Can you help me
Please upload the file to Google Drive and send me the link. I will check it.
I give you the link by email ?
Yes, you can send a link via email or reply to this comment.
I am trying to create windows 7 ultumate 32Bit installation on usb drive.
————————————————————————————————————————-
My lapbook /laptab is Atom atom z3735f 2GB Ram 32(28GB usable) SSD Storage , with 64GB SDMMC class 10 card. This model has its own EFI and do not allow any UBS/CD booting.
————————————————————————————————————————-
With AIO Boot I am able to boot with Linux Installation / Live session from usb for 64Bit also.
But 64Bit Windows can not be installed due to memory limits of processor i.e. 2 GB Even Linux runs slow.
Finally I have decided to install Windows 7 3Bit.
————————————————————————————————————————–
So far things look fair but unable to create ISO of Windows 7 32Bit installation on SDMMC card or USB Drive.
Can you guide me I have followed all the steps. But could not work.
Send me the file /AIO/Tools/error.log, I will check it. What error did the program give?
No such file is generated. It finishes the session with message of Happy Booting !
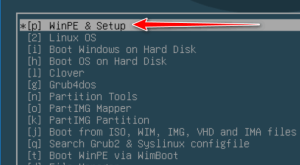
The program worked as expected. Now just boot USB and select the WinPE & Setup menu to boot Windows Setup.
It has
…
….
[J] Boot from ISO, Wim, IMG, VHD and IMA Files
….. After selection this option – [O] /AIO/FilesPartIMG/Part_IMG_ROOT.IMG comes )
[T] Boot WinPE Via Wim Boot
….. After selection this option it show some message and quickly returns to main menu
Did not you see the WinPE & Setup menu?
The laptab boots from USB with AIO Boot , that is the only achievement. It originally has Win10 32Bit which I want to replace with Windows 7 32Bit.
You can integrate multiple Windows ISO files without replacing them. Run AIOCreator.exe and remove the packages from the Menu Editor button.
That is done. But Not working , Do I need to make 32Bit Fat Visible ? it is hidden by default
Send me a screenshot of the error.
There are no errors… wim file(s) are created in USB drive but Not able to run windows 7 installer
<>
No it is not seen at all so far. Some thing is not done by me. But what is that ?
where to put screen shots ?
Did not you see the WinPE & Setup menu?
No seen this option in menu so far….
Video here: https://www.youtube.com/watch?v=ijuiJP8ijvg