
AIO Boot supports integration and boot into Windows VHD in Legacy BIOS mode. This article will guide you to boot Windows VHD from UEFI mode.
Create VHD
There are many tools that can help you create Virtual Hard Disk like AIO Boot and WinToHDD. However, you should use AIO Boot because the software is free and highly customizable by doing it manually. Please note that the Windows VHD should be used on the USB or HDD that it supports. You should use HDD instead of USB.
Here’s how to create a VHD with AIO Boot.

- Run AIOCreator.exe and switch to PartIMG & VHD.
- Under Type, select VHD.
- Open the Windows ISO file.
- In the Input file box, browse to the /sources/install.wim file.
- Output file: where the VHD file will be saved.
- Label: The label of the system drive that you will see when booting into VHD.
- Size in MB: The size of the Virtual Hard Disk you want to create.
- Click the Create button and wait until the process completes.
Or you can use WinToHDD to create the VHD and then get the .vhd file. Microsoft also provides documentation on how to create a VHD that you can reference.
Once you have the VHD file, we will add it to the Windows Boot Manager menu.
Windows Boot Manager
To boot into Windows VHD, we will add a menu to Windows Boot Manager. Because the VHD file is larger than 4GB, we will use an NTFS partition. And if you want to boot into Windows VHD in UEFI mode, we will need to add a FAT32 partition. If you are not using UEFI mode, you only need an NTFS partition.
- Download and install AIO Boot. You should partition your USB to FAT32 & NTFS. If you use HDD, you can create two FAT32 and NTFS partitions using Disk Management.
- Copy the VHD file that you created above into the NTFS partition.
- Run AIOCreator.exe, switch to Integration, continue to select Windows -> Win VHD 7/8.1/10.
- Now you can boot into Windows VHD in Legacy BIOS mode.
- You do not need to take the next steps. Now you can install Windows VHD in Legacy BIOS mode. In UEFI mode, you can boot Windows VHD from the Windows Boot Manager on an NTFS partition. But if you install new, you need to boot Windows VHD from Windows Boot Manager on FAT32 partition. Ideally, we should install it in Legacy BIOS mode, then boot in UEFI mode.
- In UEFI mode, the Windows VHD can only boot from the Windows Boot Manager menu on the FAT32 partition. If you install Windows VHD from a menu on an NTFS partition, you will get the error “Windows could not update the computer’s boot configuration. Installation cannot proceed“. We will do this manually because the AIO Boot does not have the ability to help you do this.
- Go to the \AIO\Files\WinVHD directory and note the name of the VHD file that you have integrated. We will use it in the steps below.
- If you use USB on Windows 10 in older versions than 1703, the FAT32 partition will be hidden. You need to show this partition to be able to add a menu to Windows Boot Manager, skip this step if you have access to the FAT32 partition.
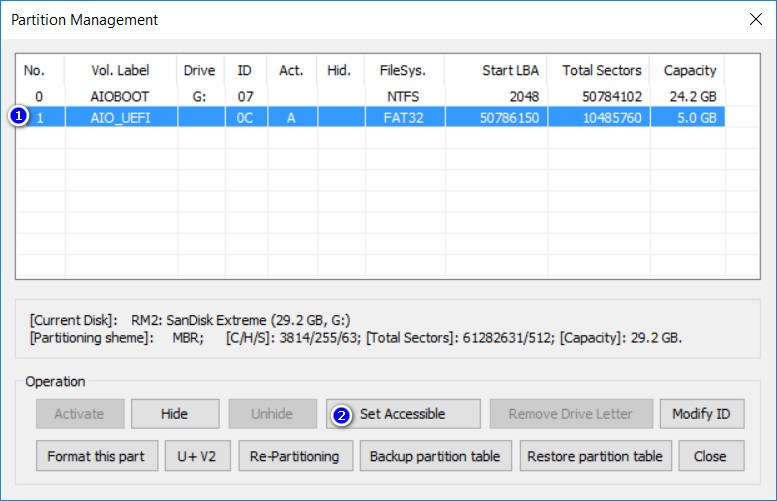
- Run AIOCreator.exe -> Tools -> Partitions Manage.
- Select the FAT32 partition in the list and click Set Accessible.
- You will now see and access the FAT32 partition.
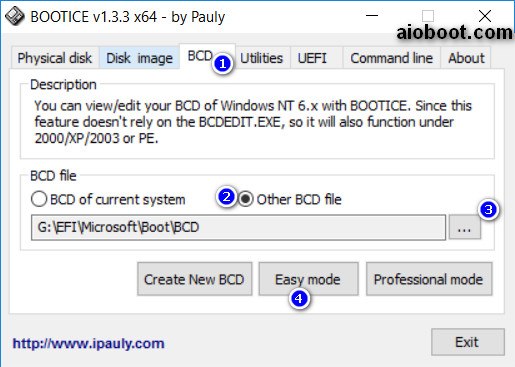
- Running BootICE, this tool can be found in \AIO\Tools folder or from AIOCreator.exe -> Tools.
- Switch to BCD, select Other BCD file, select \EFI\Microsoft\Boot\BCD file on the FAT32 partition and click Easy mode. If the file \EFI\Microsoft\Boot\BCD does not exist, you need to copy it from \AIO\Tools\MS\BCDEFI and rename it to BCD. If you want to add a menu to the BCD of the current system, select BCD of current system.
- Select Add and select New VHD boot entry.
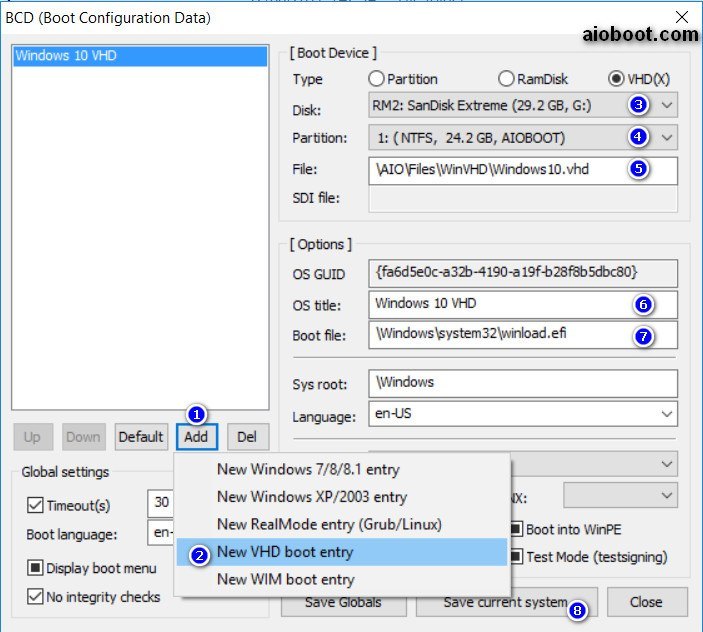
- Type: VHD(X).
- Disk: select your usb disk.
- Partition: select the NTFS partition on which you have integrated Windows VHD.
- Files: enter the path and file name that you previously integrated. See step 6.
- OS title: the menu name will be displayed.
- Boot file: \Windows\system32\winload.efi
- Click Save current system to save settings.
- Create \EFI\BOOT\EFIPART file if it does not already exist.
- Now we will hide the FAT32 partition and show the NTFS partition. See step 7.
- After you have been able to access the NTFS partition. Open the /AIO/Menu/Main.cfg file and add the following code:
### Start WinVHDUEFI if [ "$efi" ]; then menuentry "Windows VHD UEFI" { search --file --no-floppy --set=root /EFI/BOOT/EFIPART chainloader /EFI/Microsoft/Boot/boot${_SPEC_UEFI_ARCH}.efi } fi ### End WinVHDUEFI - Restart your computer for testing.
Wish success!
This doesn’t work mate.
I did on my NVME connected through USB.
Gostei muito desta Ferramenta instalei o Windows Via Lan Cabo de Rede e Funcionou.
Firstly, thank you for this really helpful tool. It has many features that I thought were impossible before (e.g. putting a >4gb .iso into a fat32 drive, booting directly from iso, vhd, wim, etc.). This is the best multi-boot tool I have used so far. Thanks again!
Regarding this topic, I was wondering if it is possible for this tool to boot from a “linux vhd”, i.e a vhd file that containes a linux distro (ubuntu for example) pre-installed using Virtualbox or VMware? If it is, then how should we proceed?
Como fazer isto com Linux?